Scaling a Sobel Filter
I've worked on a few different games that use edge detection to render non-photrealistic lines and this has lead me to do a fair bit of fiddling on my own time with various techniques, looking into both the quality of the effects and how to optimize them. This post is about my experiences taking one of the simplest filters in use and looking for a way to make it even cheaper without drastic quality loss.
An interesting issue with post-processing in any game, is that if you take it to a new platform that is substantially less powerful, how to scale the quality of it without requiring re-tuning of content (i.e. you don't want art to have to go through and readjust every use of depth of field in the game because your original technique was too complicated). Morgan McGuire discussed the importance of this in his methods for scalable motion blur and depth of field processing presented at Siggraph 2012 (http://graphics.cs.williams.edu/papers/VVSIGGRAPH12/). While McGuire's talk is focused on scaling between console generations, the engineers over at Unity frequently have discussed porting expensive effects down to mobile which is a similar problem (http://aras-p.info/texts/files/FastMobileShaders_siggraph2011.pdf, http://aras-p.info/blog/2011/02/01/ios-shader-tricks-or-its-2001-all-over-again/). In an ideal world, you can mitigate these situations by planning for your slowest platform from the beginning, but the realities of the games business don't always allow for that sort of planning.
One of the most straightforward and efficient ways to render lines for a non-photorealistic render in real-time is to process a sobel filter as a post-process on some property of your main render, typically depth and/or normals. The way a sobel filter works is pretty simple, here's a quick refresher (adapted from the wikipedia entry). For a source image\(\matrix A\), two convolution operations are applied:
$$ \matrix {G}_x = \begin{bmatrix} -1 & 0 & 1 \\ -2 & 0 & 2 \\ -1 & 0 & 1 \\ \end{bmatrix} * \matrix A \\ \\ \matrix {G}_y = \begin{bmatrix} 1 & 2 & 1 \\ 0 & 0 & 0 \\ -1 & -2 & -1 \\ \end{bmatrix} * \matrix A $$
The best way to think about these are applied in an implementation is that for the processing of each fragment, the values in the matrix notation are simply weights applied to the surrounding pixels sampled by the program, and then summed together. The magnitude of the gradient approximation from the sobel filter can be calculated via \(\sqrt {{{G}_x}^2 + {{G}_y}^2}\). That magnitude is typically then used to determine if the fragment should be a line or not.
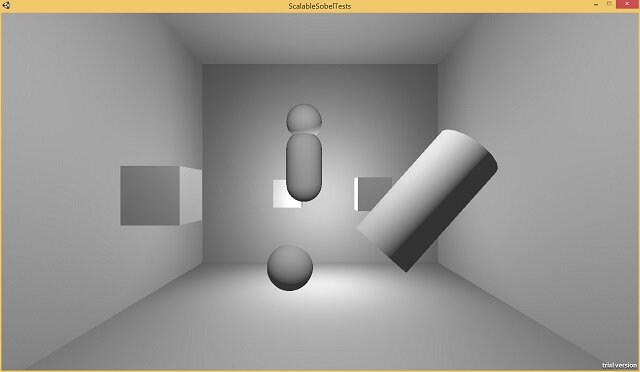
Here's a shot of a test scene I've set-up in Unity to run my effects on:
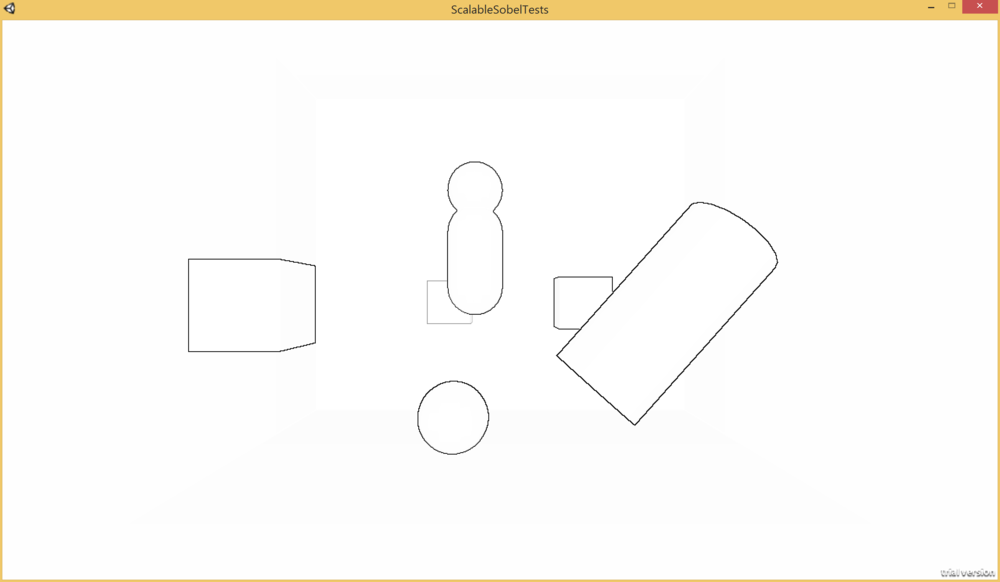
I've taken the built-in edge detect effect that ships with Unity pro has a couple of filtering variations. I've simplified the "SobelDepthThin" filter a bit (it's "thin" since the filter is tweaked to exclude exterior edges, which gives the nice property of avoiding artifacts with other depth based post processing). I've tweaked their implementation slightly to more closely match the standard Sobel filter formula I discussed previously. Here's a shot of a test scene using the effect, rendered as one minus the gradient magnitude, blended against white instead of the scene color so that only the edges are visible:
So here's a thought, what if we removed half of the weights out of the image? At some point there's only so much you can optimize the ALU of a relatively simple shader taking 9 samples (the 9th is the center pixel) to get any benefit, dropping 4 samples would have a benefit no matter what. Here's what it looks like if the vertical and horizontal samples are simply commented out of the shader:
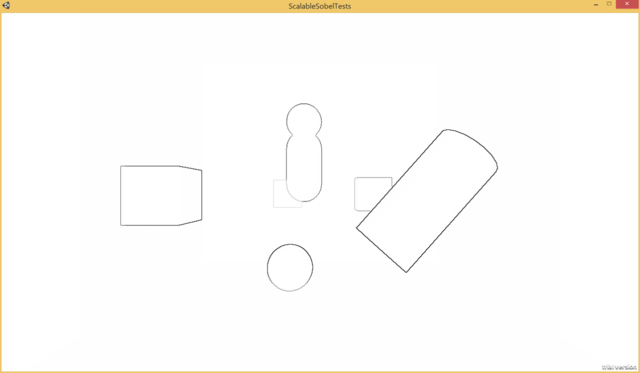
This is a bit interesting since the main details of the effect are mostly intact, but the lines are rendering more faintly for details across smaller depth discontinuities, such as with the bottom left of the capsule in the center where it overlaps the box. It seems like there should be a way to account for this and have the effects line-up reasonably well. What I realized with this was that there's actually a super convenient approximation that make these have very similar properties without hand tuning any parameters. Let's step back and look at the math for calculating \(G_x\) and \(G_y\) from the following set of samples \(M\), where \(x\) is the center depth sample:
$$ \matrix {M} = \begin{bmatrix} a & b & c \\ d & x & e \\ f & g & h \\ \end{bmatrix} \\ \\ {G}_x = -1 * a + 1 * c + -2 * d + 2 * e + -1 * f + 1 * h \\ \\ {G}_y = 1 * a + 2 * b + 1 * c + -1 * f + -2 * g + -1 * h $$
I wrote out all of the multiplications to try to help illustrate how they match up to the kernels up at the beginning of the post. In the initial approach of just dropping the weights effectively turns samples \(b\),\(d\),\(e\), and \(g\) into zeros. The trick to balance how the filter is behaving, is to treat each of those terms as the average of the two neighboring samples. Here's what that would look like plugged into the equations:
$$ {G}_x = -a + c + -2 * (0.5 * a + 0.5 * f) + 2 * (0.5 * c + 0.5 * h) + -f + h \\ \\ {G}_y = a + 2 * (0.5 * a + 0.5 * c) + c + -f + -2 * (0.5 * f + 0.5 * 0.h) + -h $$
And then if we combine the terms together, we get something very clean:
$$ {G}_x = -2a + 2c + -2f + 2h \\ \\ {G}_y = 2a + 2c + -2f + -2h $$
So the moral here, is that I just used a bunch of math to simply express "multiply the diagonal weights by 2." I guess it was really just an excuse to add more LaTeX to this post. What's more interesting is seeing how this holds up in an actual scene.
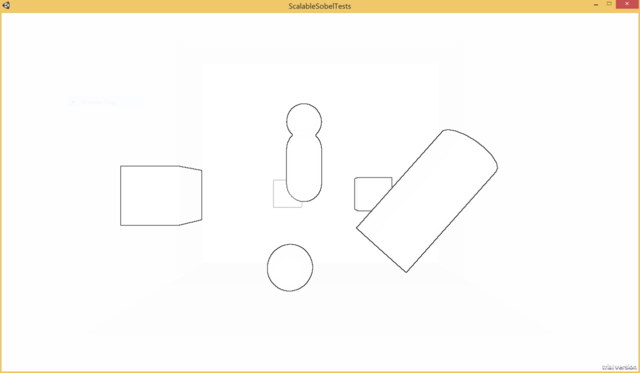
This actually looks very close to the original image! Close enough that the differences are what you call subtle. Clearly, there have to be differences Here's a BeyondCompare diff of a close-up of the cylinder/sphere intersection in the middle:
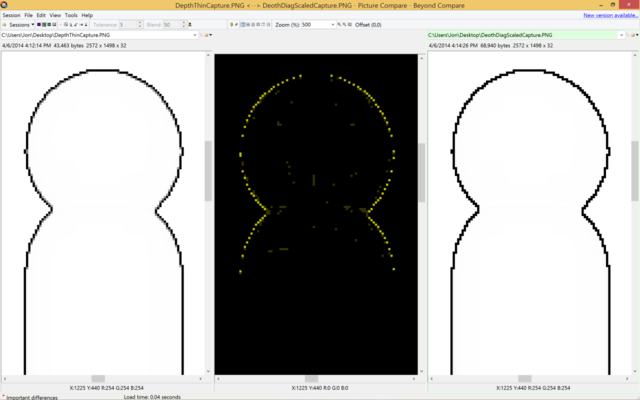
The original version is on the left, the simplified version on the right. As you can see, there are actually differences being picked up, but if you look closely a lot of the details missing are the grey / semi-opaque pixels from the left are completely black on the right. So, unfortunately, there is some quality to be lost, but nothing is for free. If you're doing something like running FXAA afterwards, that would probably more than compensate for the loss of those minor details, although on something super low powered like a mobile platform that's probably not an option. Perhaps the coolest thing that I like about the trick though is that straight lines like the vertical ones on the capsule end up essentially correct under the approximation.
So in summary, dropping half the weights out of a sobel filter turns out to potentially not be the worst idea in the world. Additionally, this post was the first time I've use LaTeX or any sort of fancy styling for it, so hopefully MathJax did not steer me in the wrong direction with its claims of "works in all browsers." Hopefully I'll get around to writing some more technical pieces in the not so distant future.